Quantcast
Channel: PHP Melody Support
Viewing all 37 articles
Browse latest View live

Verified Channels

$
0
0

Users with the “Verified Channel” mark represent a trusted source of content. The verification process or criteria depends on a per-project basis and should be handled by the site’s administrator.

“Verified channels”  display a checkmark icon to the right of the channel name, and “Verified” appears in a popup if you point your cursor at it.

In addition to having the verification badge applied to their profile/channel, verified users can also be allowed more freedom when it comes to publishing videos.

For example, users which own a “verified channel” can have their submissions automatically approved even if PHP Melody is configured to require manual approval of all user submitted content.

This feature was introduced in PHP Melody v2.6 and is part of the “Social Module”.


How to Add a New Link In the Header Menu

$
0
0

Including a new link into your PHP Melody header menu (see image) is very easy.

All you have to do is open the template file responsible for the header and include the HTML for your new link.

In the following example we’re going to include a new link, named ‘Special Link‘ which points to http://www.phpmelody.com/. Here’s how to do it.

  1. Open your /templates/[current theme folder]/header.tpl file with a plain-text editor.
  2. Search for the following HTML code:
    <li><a href="{$smarty.const._URL}/contact_us.{$smarty.const._FEXT}" class="wide-nav-link">{$lang.contact_us}</a></li>
  3. Add your new link right after the line above, like so:
    <li><a href="http://www.phpmelody.com/" class="wide-nav-link">Special Link</a></li>

That’s it. Upload the updated header.tpl file back to your PHP Melody installation and the new link will appear in the header menu.


How to Manually Change Your Password (for back-end access)

$
0
0

Losing your PHP Melody admin password isn’t the end of the world. In this post we will help you overwrite your existing password in a matter of minutes.

Reasons why you might need this tutorial:

  • forgot the darn password
  • someone changed it and forgot to tell you
  • retrieving the password via the “Forgot your password” page fails

Before you begin make sure you have the login details for your cPanel, Plesk or your hosting management console.

If you’re already familiar with MySQL simply execute this MySQL query:

UPDATE `pm_users` SET `password` = MD5('newpassword') WHERE `pm_users`.`id` = 1;

Replace “newpassword” with your desired password.

Otherwise, log into your cPanel/Plesk account:

  1. Find the phpMyAdmin link which will take you to your MySQL databases
  2. Select your PHP Melody MySQL database
  3. Select the “pm_users” table from all of PHP Melody’s tables
  4. Click on the top left “Browse” tab to see the contents of the “pm_users” table
  5. Go to the first listing (ID number 1), normally the “admin” account and click the edit button (the pencil)
  6. Once on the edit page for the admin account, type in your new password in plain text
  7. Make sure you select “md5 from the functions column (on the left of your password)
  8. Hit the “Go” or “Save” button and try your new password by accessing your PHP Melody admin area.

We also have a quick video on the entire procedure:

How to Create a Cron Job

$
0
0

The “Automated Jobs” feature from PHP Melody requires a cron job to run a PHP script on a regular basis.
Most of the times this can be easily be accomplished with the help of crontab (linux).

To setup your new cron job, you need to know the URL/command which cron will run. Retrieve this information log into your PHP Melody’s back-end and browse to the Automated Jobs > Setup page.

Once you retrieved your URL/command (should include a secret key), proceed with setting up your cron job as follows.

Method 1: Setup cron via cPanel, Plesk or your webhost panel

If you’re running PHP Melody on a shared hosting account or VPS, your webhost has already provided you with some sort of management area such as cPanel or Plesk.

Since adding a new cron job is already very well documented for both cPanel and Plesk we recommend using their instructions:

We also have a quick video on the entire cPanel procedure:

Method 2: Creating a new cron job using the command line (linux)

If you own the server or have access to the command line, edit your crontab by running:

# crontab -e

In a new line, add your cron job by pasting in the following line:

*/5 * * * * wget -q "http://www.PHPMELODY-URL.com/cron.php?cron-key=SECRET_KEY"

This example uses a dummy URL. To get your URL (with the secret key), visit your PHP Melody back-end and browse to the Automated Jobs > Setup page.

Upload Error #2049 Explained

$
0
0

If while uploading a video or image to your PHP Melody site you get Error #2049, the might be within the /config.php file.

Check your /config.php file and make sure the URL is 100% accurate and does not include a trailing slash (i.e. /) at the end of the domain name.

Correct URL:

define('_URL', 'http://www.phpsugar.com');

Incorrect URL:

define('_URL', 'http://www.phpsugar.com/');

The Ultimate Guide to PHP Melody Updates

$
0
0

You’re here because you need help with an update problem or it’s your first time updating PHP Melody. Either way, the following guide should answer all your questions.

This document is divided into the following sections:

Overview

New features, improvements and bug fixes for PHP Melody come in the form of an update package. Applying the update packages is 100% optional but we do recommend you try to keep your PHP Melody website(s) up to date.

Updates bring changes to both the PHP Melody file structure as well as its MySQL database. That is why it’s crucial to always use the official update packages to update your video site. We’ll show you how to correctly update your PHP Melody later in this guide.

In case you don’t have the time or desire to keep your PHP Melody up-to-date, we’re here to help. Our team can ensure your PHP Melody installation is always up-to-date by applying the new update packages. Please contact our support team to arrange for this service.

How do I know which PHP Melody version I’m using now?

Log into your website’s admin area and in the footer of all your pages you can find the PHP Melody version (as shown below):

powered

Note: In rare cases where the wrong patch/update files were applied in the past, an incorrect version might appear in the footer. Learn more about this in the ‘Troubleshooting’ section below.

How can I get the update packages?
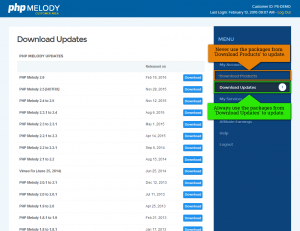
UpdateYour customer account will give you access to both the full purchased product(s) as well as all the available update packages for each product.

The full product packages should only be used for new installations (never for updates).

To download the required update package(s), log into your Customer Account and browse to the ‘Download Updates‘ page.

It’s important to mention that you cannot and should never update your PHP Melody website(s) by applying the packages you can get from the ‘Download Products‘ page (i.e. the full product package).

To update your PHP Melody site correctly, always use the packages from the ‘Download Updates‘ page (i.e. the update package).

While it may sound obvious to you, we mention this because some customers have attempted to update their websites with the full package from the ‘Download Products‘ page only to find out that it ruins the site. That is because only the update packages include MySQL updating files.

Note: If you’ve applied the wrong update package or the full package, please see the ‘What can I do if I applied the wrong update or uploaded the full package by mistake?’ answer below.

How can I update my old PHP Melody installation?

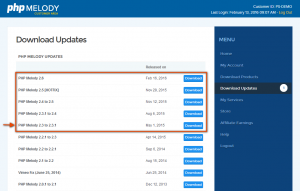
Let’s begin by assuming you’re currently running PHP Melody v2.3 and need to update to the latest version which is v2.6.

Since between v2.3 and v2.6, we’ve released 5 other versions (v2.3.1, v2.4, v2.5, v2.5 [hotfix] and lastly v2.6), you will have to download all these update packages.
update-packs


You should end up with 5 zip packages saved locally. Begin the update process by unzipping the first update package (v2.3.1) and read the included Update Guide 2.3.1.pdf file. Note: each includes a update guide PDF.

Always read the Update Guide because each update includes important update instructions.

The update guides will advise you to only upload the update package after creating a backup of your current installation. Always backup your files and MySQL database before updating. Any problems can easily be solved by restoring the backup.

Once you’ve uploaded all the files and folders, log into your PHP Melody back-end site and follow the on-screen instructions to finish the update process. Logging into your administration area after uploading the update package is a mandatory step. It’s easy to overlook this step if you apply multiple updates.

Finally, if no update steps were skipped, your site will be updated to v2.3.1. You can now continue applying the next update package (v2.4). Repeat until you reach the latest version.

In summary, the key to a successful update is to: backup your existing files and MySQL database, read and follow the update instructions from the PDF, upload all the files and folders from the update package and update the MySQL database.

In case your site is using plugins/modules or custom themes, please see the ‘Troubleshooting’ section below. Any custom theme or plugin also has to be upgraded.

What can I do if I applied the wrong update or uploaded the full package by mistake?

Case 1: Uploading the wrong files without altering the MySQL database.

PHP Melody updates have safety-checks to ensure that you cannot accidentally apply the wrong update package. However, this covers the MySQL changes and it won’t prevent you from uploading the wrong files via FTP.

Let’s say you’re using PHP Melody v2.3 and, by mistake, uploaded the latest full package; v2.6. In this case, just restore the PHP Melody v2.3 files from the full package and overwrite the v2.6 files. In case you no longer have the v2.3 full package, please contact our support team and we will be happy to send you the required files.

After uploading the correct files, you can resume the update process by applying an update package.

Case 2: Applying both the wrong files and modifying or corrupting the MySQL database.

Without a backup there is little chance of fixing this problem by yourself because the damage is too extensive.

You shouldn’t worry because our team provides data recovery and general recovery services. We’ve successfully fixed numerous sites and recovered data in as fast as 24 hours for our customers.

We can help you fix corrupted MySQL tables, recover data from old PHP Melody installations and update your site in the process. Please get in touch with us if you’re looking to recover a crashed or wrongly updated site.

Frequent Asked Questions:

  1. I have an old PHP Melody site.  Can I skip straight to the latest update package?
    No. To correctly update PHP Melody you will have to apply each missing update; one after another. Read the “How can I update an old PHP Melody installation?” answer from above.
  2. Can I install the latest version and use my existing/old MySQL database?
    No. Because all updates include MySQL database changes your previous database will not have those changes. Having a mis-match between the files and the MySQL database version will cause problems. The PHP Melody files and the MySQL database should belong to the same version.
  3. I’ve been using a nulled copy but I want to update it. How can I get the missing update packages?
    Contact our team and describe your situation. We will send you the missing update packages. Be sure to mention which PHP Melody version you’re using at the moment.
  4. I’ve messed my website. Can you fix it for free?
    We’re glad to fix our bugs and problems free of charge. However, any intervention to fix problems caused by applying the wrong updates or incorrect product usage is a paid service.

Troubleshooting

I’ve updated my site exactly as you instructed but I cannot see the new features in the front-end.

In this case one of two things might have happened. Firstly, ensure the new feature(s) are not disabled by default (because some are). If your site uses a custom theme, make sure the theme is also up-to-date. To update your theme, simply download the latest theme version from your Customer Account and upload it to your site.

With each update, we’re also updating our available themes and plugins. Be sure to update your custom theme as well. Unlike PHP Melody, you can skip to the latest PHP Melody theme as long as the PHP Melody version and the theme version are the same/match.

I’m trying to change the settings form the back-end but the settings page doesn’t save them.

Such behavior indicates the MySQL database is not up to date. This is caused by either skipping updates or neglecting the last update step; updating the database. Since there is no general solution for this, contact our team. We can update your database for you (paid service).

My admin footer indicates I’m using the latest version but I don’t see the features or the latest theme.

There is a (slight) possibility that the version indicated is not true. This happens if someone manually updates the version number by hand or if the wrong update package was applied. If you’re unsure about this, contact our support team right away.

You may want to manually change the PHP Melody version so that you can apply the correct update package. To manually change the version number, use phpMyAdmin to manually edit the ‘pm_config’ table. Look for the ‘version’ entry and change the version as needed.

Warning: under normal circumstances you should never find yourself doing this. If you are, something has gone terribly wrong and perhaps the best idea would be to get in touch with our support team and determine what needs to be done next.
Never update the version number by hand unless you really know what you’re doing. We cannot take any responsibility for the problems this might cause.


How to create a YouTube API key

$
0
0

This document is intended for PHP Melody customers who seek to import videos form YouTube. To import YouTube videos into your PHP Melody site, you will need a YouTube API key.

We’ve created a video which guides you step-by-step through the entire process.


How to remove the “Powered by…” footer link

$
0
0

These instructions are for PHP Melody licenses which include the rights to remove the “Powered by” footer link (e.g. Brand-Free and Unlimited licenses).

To remove the “Powered by …” link form the footer of your site follow these steps:

Open the /config.php file with a plain text editor and locate the following line:

define('_POWEREDBY', 1);

Replace line with:

define('_POWEREDBY', 0);

Save the changes and upload to your installation.

Note: PHP Melody “Standard” license holders do not have permissions to remove the “Powered by” footer link. Removing the “powered by” link form a “Standard” license will invalidate the license.


How to increase time limit for ‘Videos being watched now’

$
0
0

PHP Melody lists on the homepage the latest videos watched in the past 3 minutes.

To increase or decrease the limit from 3 minutes, open /include/functions.php

Find:

$time_diff -= (3 * 60);

Replace the number 3 with the desired number of minutes and save the changes.

Featured Categories on Homepage

$
0
0

Starting with PHP Melody v2.5 you can show videos from selected categories on your homepage. We call those “featured categories”. To show a featured category on your homepage simply browse to your PHP Melody back-end and follow the instructions as illustrated below.

Clicking on the home icon will mark any category as “featured”.

Crontab generates many empty files

$
0
0

Our crontab syntax already includes an option which prevents files form being generated each time the crontab runs.

However, some hosting providers may require an different crontab command.

If your default crontab command looks something like:

wget -q "http://demo.phpmelody.com/cron.php?cron-key=68afdf2c980faf60924dc188b9ab583a"

You will have to use the -O option as illustrated below:

wget -O /dev/null "http://demo.phpmelody.com/cron.php?cron-key=68afdf2c980faf60924dc188b9ab583a"

500 Internal Server Error – Explained and Solved

$
0
0

internal_errorWhat is the 500 Error?

Put simply, the 500 error is what we call a “server-side” error. That means that there is something wrong with the server who is hosting the website. It is an extremely general error usually caused by configuration issues with the websites programming, PHP or system permissions.

What causes 500 Internal Server Errors?

500 errors can frequently occur with incorrectly configured rewrite rules contained in your .htaccess file.

Fixing the 500 Internal Server Errror

If you’ve recently made changes to your PHP Melody file structure or applied an update package, please review your current .htaccess file.

If this file was overwritten recently, please review your previous .htaccess file for any extra lines. Perhaps your server requires those additional lines.

How to find out if .htaccess is the problem?

Simple. Rename your existing .htaccess file into .htaccess-bk and see if that removes the 500 internal error.

This may not be the only problem so, if renaming the .htaccess file doesn’t get rid of the error, here a few other options:

  • Review your error_log file for any errors. Those error messages usually include more details about what exactly is wrong with the server.
  • Report the problem to your hosting provider. Most likely the hosting company can easily sort such problems for you
  • Contact our support team. We’re ready to help with any problems (even server issues). To speed things up, include FTP credentials to your installation.

Error #2035 Explained and Solved

$
0
0

What causes the #2035 Error?

Most likely this error occurs only in Mozilla Firefox. If you’re using Firefox as the default browser, check your videos with another browser (e.g. Chrome) to see if you get the same error.

The error is caused by several things:

  • A bug in the Mozilla Firefox browser
  • The video you’re trying to play is a missing/removed YouTube video.

How can I fix the #2035 Error?

First things first. Check that the video(s) returning this error actually work on YouTube.com.

Secondly, we recommend updating your Firefox version to the latest release. After updating your browser, also check that Adobe Flash is updated to the latest release as well. You can update Adobe Flash here.

If nothing works, you can always change the default player for YouTube in PHP Melody to either the “Original Player“, another version of JW Player or Video JS.

How to Fix: Warning: session_start() [function.session-start]: open(/tmp/sess_…O_RDWR) failed.

$
0
0

So, you’ve just installed or moved your PHP Melody installation to a new server and you’re greeted with this message:

Warning: session_start() [function.session-start]: open(/tmp/sess_e0725de9954b..2c14904, O_RDWR) failed: Permission denied (13) in /home/melody/public_html/stuff.php on line 42

This error basically indicates that the server’s PHP installation is not really configured that well. Note: We’re not referring to the PHP Melody installation, but the actual PHP runtime.

As a result, the first thing you should do is report this error to your hosting provider. They should have a ‘live chat’ available for such things and you could solve this problem in a matter of minutes.

If for some reason you don’t or can’t report the problem to someone who will address it, you may be able to solve this problem yourself.

How to change the sessions folder

Most hosting providers will allow you to either create your custom php.ini file or modify an existing php.ini file via your cPanel or Plesk account.

See if your hosting provider allows you to update your “PHP Configuration” from your account management panel (cPanel, Plesk, etc.).

Once you’ve found your PHP configuration file (php.ini), search for the following line:

session.save_path =

If you don’t have root access to the server in order to set the correct permissions to the /tmp folder, create a new folder which you can control and use it as the default folder for your PHP session files.

For example, if your hosting’s account path is:

/home/videos34/public_html/

Create a new folder for your sessions (outside the public_html folder would be best) as such:

/home/videos34/tmp/

Next, change the permissions for your tmp folder to 0777 (fully writable).
Now you can specify this new folder in your php.ini as such:

session.save_path = '/home/videos34/tmp/'


XML error: syntax error at line 1

$
0
0

PHP Melody sites running versions older than v2.3.1 might give the following error while working/importing YouTube videos:

XML error: syntax error at line 1

In case your site is running a PHP Melody version earlier than v2.3.1, you will have to update it to the latest release because the YouTube API used before PHP Melody v2.3.1 is now deprecated (no longer working). Such sites cannot be fixed as the entire API code was replaced throughout the codep/product.

Check our update guide to update your PHP Melody site today.


How can I change the header background color?

$
0
0

Updating the header background color in the Echo theme is quite easy.

Open your /templates/Echo/css/echo.css file:

Find:

/*-----------------------------------------------------------------------------------*/
/*    3.Header (Navigation, Search, etc.)
/*-----------------------------------------------------------------------------------*/
header.pm-top-head {
  display: table;
  position: fixed;
  background: #FFF;
  border-bottom: 1px solid #e8e8e8;


Replace both #FFF and #e8e8e8 with your desired color code.

Adding iOS Icons for Bookmarks

$
0
0

Since newer PHP Melody themes such as the Echo theme are responsive you might want to add your own app-like icon for iOS devices.

That’s because when bookmarked, your site will have a nice little icon on the user’s screen; just like a native app.

Pro tip: You can create the required icons from your own logo: http://iconifier.net/

Your default icon should be 57x57px. But iPad and Retina devices need to provide more sizes. iPad requires icons with the size of 72x72px, while Retina devices need icons with 114x114px size.

Once you have the icons you need to edit your PHP Melody theme header.

Open:
/templates/[current theme]/header.tpl

Find:

<link rel="shortcut icon" href="{$smarty.const._URL}/templates/{$smarty.const._TPLFOLDER}/img/favicon.ico">

After, add:

<link rel="apple-touch-icon" href="http://your-site-com/icon.png"/>
<link rel="apple-touch-icon" sizes="72x72" href="http://your-site-com/icon.png"/>
<link rel="apple-touch-icon" sizes="114x114" href="http://your-site-com/icon.png"/>

How to Setup Twitter Login

$
0
0

Starting with version 2.7, PHP Melody comes with social login integration for both Twitter and Facebook.

In this tutorial we’ve set out to cover the Twitter integration. We’ll take you through the steps required to create a new app in Twitter and integrate this into PHP Melody.

The ultimate goal being to allow your visitors to register and log in using only their Twitter account.

Step 1: Creating a new Twitter App

Log into your Twitter account and then go to https://apps.twitter.com/

Click on the ‘Create a new app’ button and fill in the provided form. Very easy and straightforward.

Under the ‘Callback URL‘ you need to enter:
http://www.your-PHPMELODY-site.com/login.php?do=twitter

Your application should look like this: http://imgur.com/EaltmMF

Step 2: Get your API Key and API Secret

Once successfully created, your new Twitter App will come with a Consumer Key (API Key) and a Consumer Secret (API Secret).

Go to your Twitter App from https://apps.twitter.com/ and select the “Keys and Access Tokens” tab.

Copy the API Key and Secret into a text file.
If you have trouble locating the keys, here’s where they are: http://imgur.com/X111YpJ

Step 3: Add your Twitter API Key and API Secret into PHP Melody

Log into your PHP Melody website’s back-end and go to Settings > User tab.

Enter your keys in the Twitter Login form which is found under the User tab.

Only thing left to do is Enable the Twitter Login, hit ‘Save Changes‘ and you’re ready to accept Twitter users.

If you’d also like to integrate Facebook Login into your PHP Melody website, check out this tutorial.

How to Setup Facebook Login

$
0
0

Starting with version 2.7, PHP Melody comes with social login integration for both the Twitter and Facebook social networks.

In this tutorial we’ve set out to cover the Facebook integration. The Twitter integration is covered in this tutorial.

We’ll take you through the steps required to create a new app in Facebook and integrate this into PHP Melody.

The ultimate goal being to allow your visitors to register and log in using only their Facebook account.

Step 1: Creating a new Facebook App

Log into your Facebook account and then go to https://developers.facebook.com/apps/

  • Click on the ‘Add New App‘ button, select ‘Website (www)‘ as the platform.
  • Enter your apps’ name and click ‘Create new Facebook App ID‘. Fill in the form and proceed to ‘Create App ID‘.
  • Fill in your ‘Site URL‘ and click ‘Next‘.
  • You’re now finished setting your Facebook App.

Step 2: Setting your new Facebook App

You should now see your new Facebook app listed under:
https://developers.facebook.com/apps/ (as seen here)

  • Click on your new app’s name
  • Under ‘Products’ click + Add Product (as seen here)
  • Select ‘Facebook Login‘ and click ‘Get Started
  • You will be presented with this form.
    Under ‘Valid OAuth redirect URIs‘ you need to enter your URL as such:
    http://www.your-PHPMELODY-site.com/login.php?do=facebook
  • Save the changes.

Since the app is not yet live, you need to make it available to the public so that Facebook users can log into your PHP Melody website using their Facebook account.

View post on imgur.com

Step 3: Add your Facebook APP ID and APP Secret into PHP Melody

You can now retrieve and use your App’s ID and Secret and add them into your PHP Melody installation. Here’s where to find your App ID and App Secret:

View post on imgur.com

Log into your PHP Melody website’s back-end and go to Settings > User tab.

Enter your keys in the Facook Login form which is found under the User tab.

Only thing left to do is Enable the Facebook Login, hit ‘Save Changes‘ and you’re ready to accept Facebook users.

Note: Sometimes the ‘Check App Status‘ button from PHP Melody might return an error message. You can safely ignore this error message if the front-end Facebook Login works.

Disable CSRF

$
0
0

PHP Melody uses CSRF protection by default. If you experience the following error message in your back-end, please consider disabling CSRF:

Invalid token or session expired. Please load this page from the menu and try again.

Here’s how to do it:

Disable CSRF

Viewing all 37 articles
Browse latest View live